Section-25, Installing the rails for the lower flash enclosure (I1-F04)
Procedure
- At the rear of each rail, unscrew the smaller diameter locating pins (white arrow) for
round hole racks and replace with the larger diameter locating pins for square hole racks. See
Figure 1. Important: The locating pin must face the front of the rack.
Figure 1. Flash enclosure rail locating pin, rear right (view from front of rack) 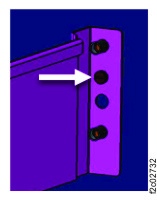
- At the front of each rail, unscrew the smaller diameter locating pin for round hole racks
and replace with the larger diameter locating pin for square hole racks. See Figure 2.
Figure 2. Flash enclosure rail screw holes, left front 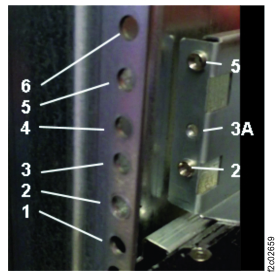
- At the rack rear rail install a nut clip 3 at hole
3. See Figure 3.
Figure 3. Flash enclosure rail screw holes, rear left 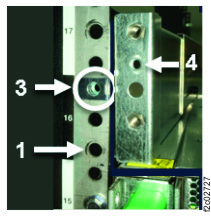
- On each enclosure rail loosen the two side screws 1 . See
Figure 4.
Figure 4. Flash enclosure right rail extension side screws 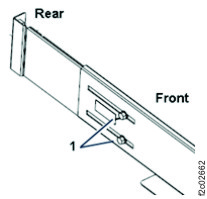
- At the rear, fasten the flash enclosure rails to the rack
rails.
- The flash enclosure rail is different from other rails. The rear of the enclosure rail fastens to the rear side of the rack rail. The locating pin (white arrow) and two threaded nuts (black arrows) push through the rack rail. See Figure 5 and Figure 6.
- Install a screw at white arrow. See Figure 6.
Figure 5. Flash enclosure rail fastened to rack rail, rear right (view from front of rack) 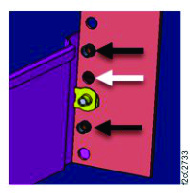
Figure 6. Flash enclosure rail fastened to rear of rack rail (left side) 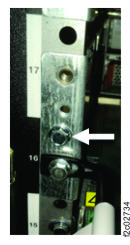
- At the front, extend the rail fully so the locating pins stick through the rail holes
 and
and  . See Figure 2.
 - At the front only, install a spring nut (green arrow) in the top cutout of each rail. See
Figure 7.
- Ensure the spring nut squeezes the enclosure rail and rack rail together.
Figure 7. Flash enclosure rail spring clip, front 
- Ensure the spring nut squeezes the enclosure rail and rack rail together.
- Tighten the two rail extension screws
 on each
rail. See Figure 4. Note: The front of these rails are not fastened to the rack with screws.
on each
rail. See Figure 4. Note: The front of these rails are not fastened to the rack with screws.