Exchange the host cable that connects to the host adapter card
Before you begin
 Use approved ESD procedures to prevent damage.
Attention:
- This procedure is not a stand-alone procedure. Customer disruption and damage to the hardware might occur when microcode and power boundaries are not in the proper conditions for this service action.
- If a serviceable event FRU repair directed you to this procedure, the microcode and power boundaries are already set.
- If a serviceable event FRU repair did not direct you to this procedure, see MAP1230 Replace a FRU without using a serviceable event.
Notes:
- All the cables and FRUs to be removed must be uniquely identified so they can be reinstalled correctly.
- If an installed earthquake resistance kit prevents you from accessing this FRU, refer to MAP1600.
Remove host cable from host adapter card
Procedure
- At the rear of the rack, disconnect the host cable
 from the host adapter card in the
I/O enclosure. See Figure 1.
from the host adapter card in the
I/O enclosure. See Figure 1.
Figure 1. Tailgate cable and Fibre Channel cable retention (Model 95x shown, Model 96x is similar) 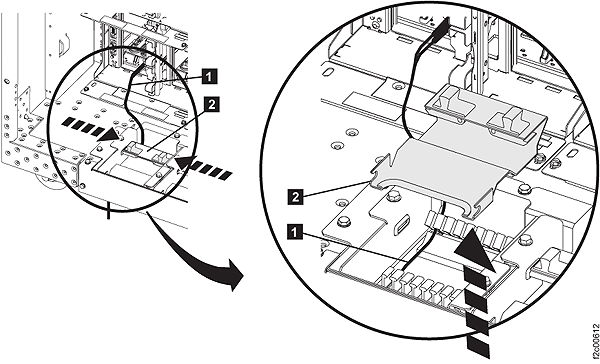
- Squeeze the black release levers
 , pivot the retention bracket upward,
and remove it.
, pivot the retention bracket upward,
and remove it.
Install host cable to host adapter card
Before you begin
Important: The optical cable plugs (LC connectors) and ports (SFPs) must be
cleaned before connecting them. Use cleaning tool 54Y4392 or IBM-approved alternative. After
cleaning SFPs with the tool, use air bulb 45D2645 or IBM-approved alternative. For detailed
procedures, refer to current DS8000 Info Alerts or contact your next level of support.
Procedure
- Route the host cable up through the tailgate and connect
it to the host adapter card connector in the I/O enclosure. See Figure 1. Note: If there is not enough room to route the cable through the opening, remove the two screws and lift the assembly partially up.