Exchange the storage enclosure midplane
Before you begin
 Use approved ESD procedures to prevent damage.
Attention:
- This procedure is not a stand-alone procedure. Customer disruption and damage to the hardware might occur when microcode and power boundaries are not in the proper conditions for this service action.
- If a serviceable event FRU repair directed you to this procedure, the microcode and power boundaries are already set.
- If a serviceable event FRU repair did not direct you to this procedure, see MAP1230 Replace a FRU without using a serviceable event.
Notes:
- All the cables and FRUs to be removed must be uniquely identified so they can be reinstalled correctly.
- If an installed earthquake resistance kit prevents you from accessing this FRU, refer to MAP1600.
Remove the storage enclosure midplane
Before you begin
Notes:
- Ensure you have been directed here by a management console guided FRU replacement procedure. The FC-AL fabric for this and the directly associated storage enclosures must be in the proper state to protect the customer from data loss.
- This procedure requires an 8 mm socket wrench.
Procedure
- At the rear of the storage enclosure, release
both power input cables from the retention brackets
 and disconnect them. See Figure 1.
Figure 1. Storage enclosure power supply power input cable and retaining bracket 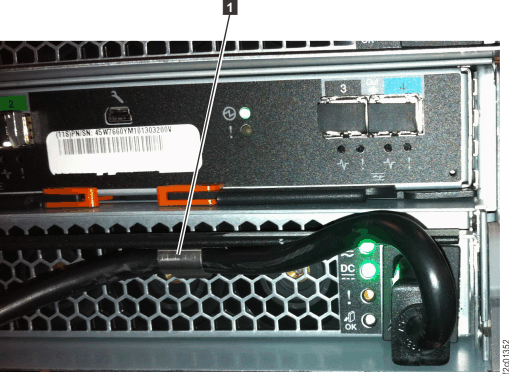
- At the front of the rack, remove each DDM from the storage
enclosure and set in a safe place. You must ensure each one will be
plugged in the same position in the new storage enclosure. It is recommended
you write down the serial number and position of each part prior to
removing them. See Figure 2.
Figure 2. Storage enclosure locations front (24 DDM slots, 2.5 inches drives) 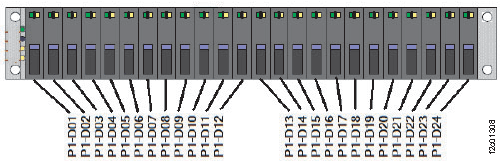
- To remove components from
the rear of the storage enclosure, you might need to:
- Loosen cable ties
- Remove the cable tray from the enclosure being serviced or the enclosure above it
- Loosen or release the cable ties holding the FC-AL and power cables as needed.
- If you need to remove the cable tray, release the cable ties. Then, lift up on the spring-loaded latches at the left and right end of the tray and then slide the tray to the rear. See Figure 3.
Figure 3. Cable tray spring-loaded latch 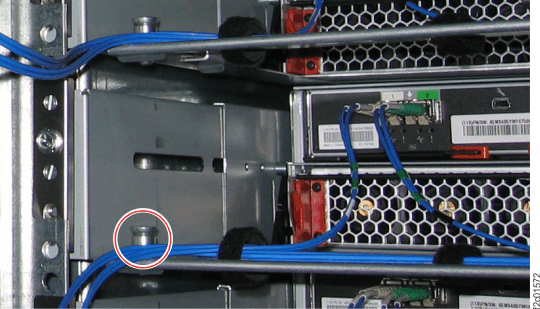
- At the rear of the rack, remove each FCIC card (P1-C1 and
P1-C2). See Figure 4.
You must ensure each one will be plugged in the same position in the
new storage enclosure. It is recommended you write down the serial
number and position of each part prior to removing them. Note: For help removing the FCIC card FRUs, refer to Exchange the Fibre Channel interface card (FCIC), optical.
Figure 4. Storage enclosure locations rear 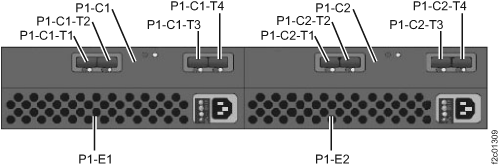
Install the storage enclosure midplane
Procedure
- The new storage enclosure midplane chassis has no serial
number. You need to apply serial number labels to the new chassis.
- Find the Repair Identification label sheet
that was taped to the top of the new midplane chassis. See Figure 5.
Figure 5. Repair identification label sheet 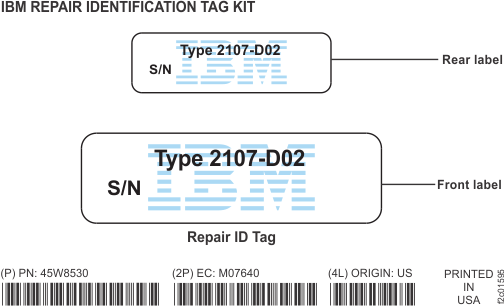
- At the front of the new chassis, apply the
front label on the right mounting surface in the same place as the
old chassis. Ensure the label does not block the bottom screw hole.
See Figure 6.
Figure 6. Storage enclosure midplane front serial-number label (24 DDM slot storage enclosure shown; 12 DDM slot storage enclosure similar) 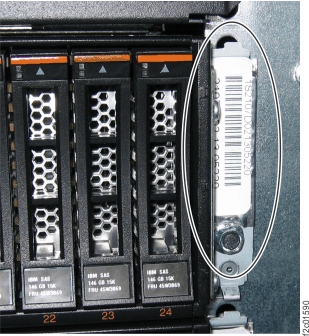
- At the rear of the new chassis, apply the
rear label to the same label location between the two FCIC cards as
the old chassis. See Figure 7.
Figure 7. Storage enclosure midplane rear serial-number label 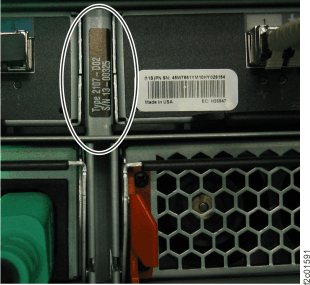
- Find the Repair Identification label sheet
that was taped to the top of the new midplane chassis. See Figure 5.
- Install each FC-AL cable in the exact position
as it was in the old storage enclosure.
Use the location code labels on each cable to ensure it is properly connected.
- If your FC-AL cables have location labels which include the physical location code (example: XC2-P1-C6-T2), refer to Figure 8. After the cables are connected, go to step 12.
- If your FC-AL cables have location labels with only the three-character connection designators (example: 4A1), go to step 11.
Figure 8. FC-AL location codes for the Fibre Channel interface card (FCIC), optical FC-AL ports 
-
Determine whether Rack-1 FC-AL cabling is "standard" or "business
class."
- Find the rack internal model label to the left of the
upper PPS (Model 951) or DC-UPS (Model 961).
The label will be on the left sidewall of the rack, and it is shown
in Figure 9.
Figure 9. Rack-1 configuration labels (examples) 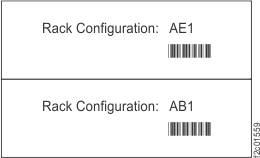
Figure 10. Point-to-point cabling diagram for the FC-AL cables (Models 951, 95E - Rack-1 Configuration: AE1; Models 961, 96E) (rear view, racks 1-2) 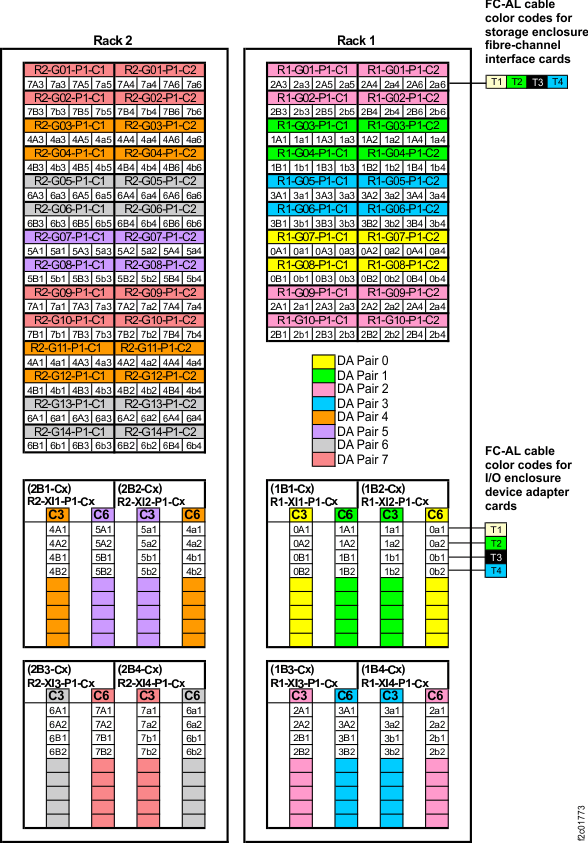
Figure 11. Point-to-point cabling diagram for the FC-AL cables (Models 951, 95E, Models 961, 96E) (rear view, racks 3-4) 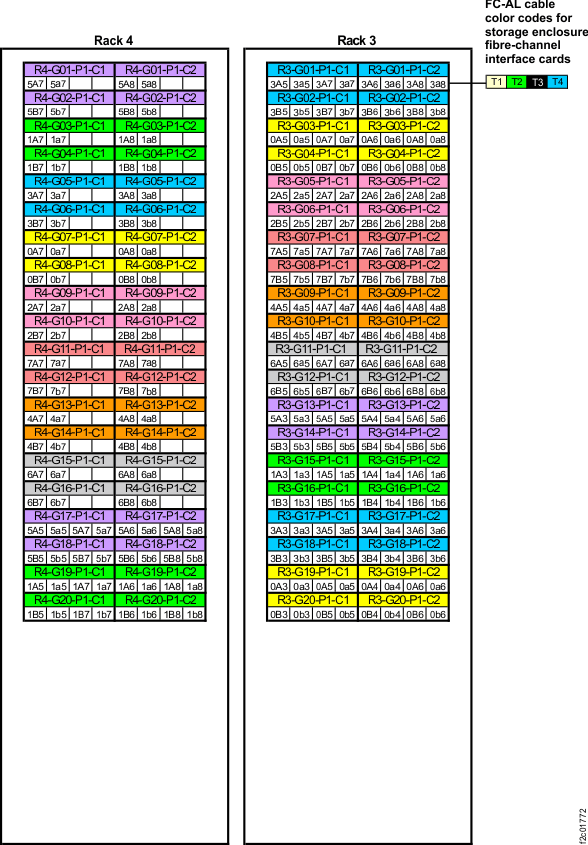
Figure 12. Device adapter pair IDs for storage enclosures (Model 951 with business class cabling) (rear view) 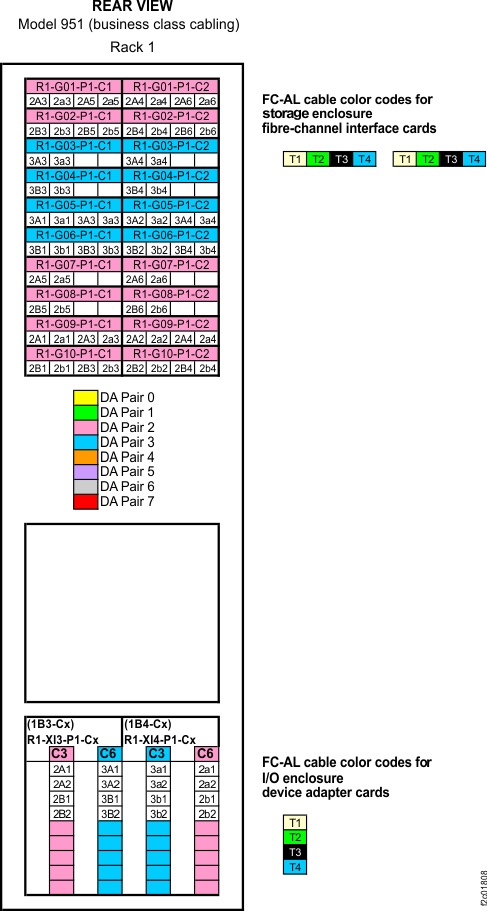
Figure 13. Point-to-point cabling diagram for the FC-AL cables (Models 961, 96E) (business class) (rear view, racks 1 and 2) 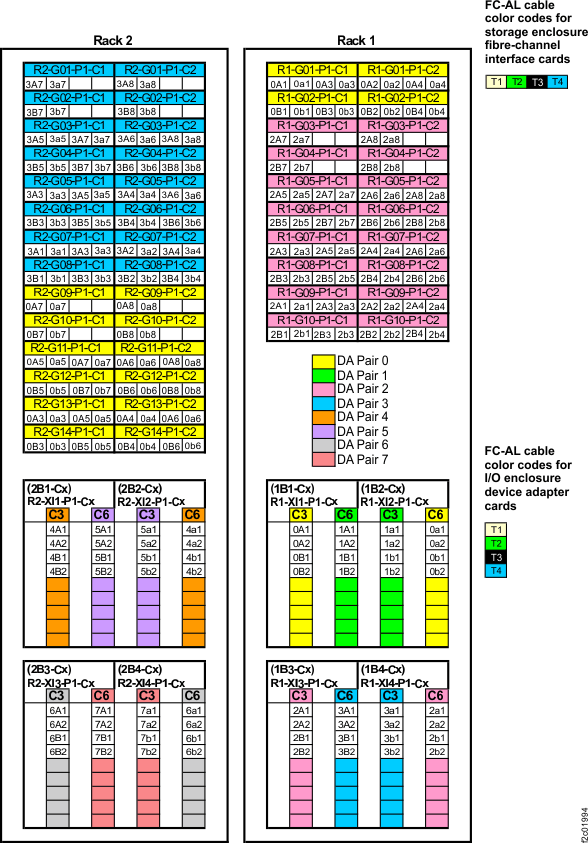
Figure 14. Point-to-point cabling diagram for the FC-AL cables (Models 961, 96E) (business class) (rear view, racks 3 and 4) 
- Find the rack internal model label to the left of the
upper PPS (Model 951) or DC-UPS (Model 961).
The label will be on the left sidewall of the rack, and it is shown
in Figure 9.