Exchange the CEC enclosure service processor or time of day battery
Before you begin
 Use approved ESD procedures to prevent damage.
Attention:
- This procedure is not a stand-alone procedure. Customer disruption and damage to the hardware might occur when microcode and power boundaries are not in the proper conditions for this service action.
- If a serviceable event FRU repair directed you to this procedure, the microcode and power boundaries are already set.
- If a serviceable event FRU repair did not direct you to this procedure, see MAP1230 Replace a FRU without using a serviceable event.
Notes:
- All the cables and FRUs to be removed must be uniquely identified so they can be reinstalled correctly.
- If an installed earthquake resistance kit prevents you from accessing this FRU, refer to MAP1600.

Remove the service processor or battery
Procedure
- At the rear of the storage facility, view
both CEC enclosure power supplies.
Figure 1. CEC enclosure DC good LEDs 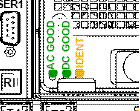
Are both DC GOOD LEDs flashing?
- Yes, continue with the next step.
- No, do not continue with this FRU replacement. Go to MAP4840 CEC enclosure fails to power off during CEC enclosure parts exchange to fix the problem with the CEC enclosure not being in the power off state.
- Remove
all power from the CEC enclosure.
- At the rear of the CEC enclosure, disconnect the power input cables
 to both CEC enclosure power supplies.
 - At the CEC enclosure control panel, observe
the green Power® Present icon,
beneath the white Power button.
- If it is slow flashing, the CEC enclosure is still in the power-off state. DO NOT CONTINUE. Ensure that you have unplugged the power cables.
- If it is off, go to the next step.
Figure 2. CEC enclosure (rear) 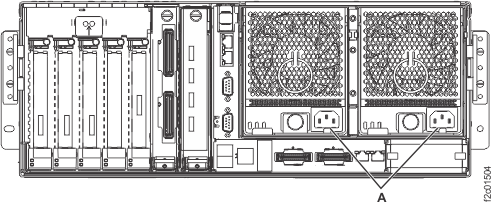
- At the rear of the CEC enclosure, disconnect the power input cables
- Remove the service processor. See Figure 3.
Figure 3. Removing the service processor card 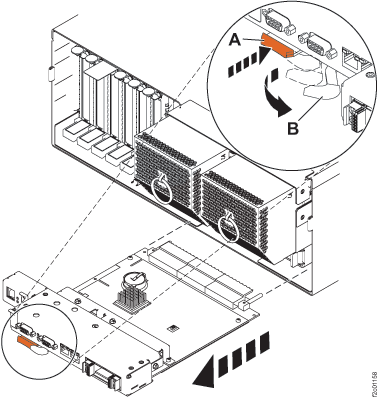
- Disconnect all cables connected to the service processor.
- Press the thumb release on the service processor to unlock
the handle.
- Pull the handle
 to the right to unseat the service processor.
- Pull the service processor from the I/O backplane assembly using the handle and supporting the bottom of the card.
- If replacing the battery, do the following:
- Remove the time-of-day battery from the service processor as shown
in Figure 4.
CAUTION:The battery contains lithium. To avoid possible explosion, do not burn or charge the battery.Do not:
- Throw or immerse into water.
- Heat to more than 100-degrees C (212-degrees F).
- Repair or disassemble.
Exchange only with the IBM-approved part. Recycle or discard the battery as instructed by local regulations. In the United States, IBM has a process for the collection of this battery. For information, call 1-800-426-4333. Have the IBM part number for the battery unit available when you call. (C003)
Figure 4. Removing the time-of-day battery 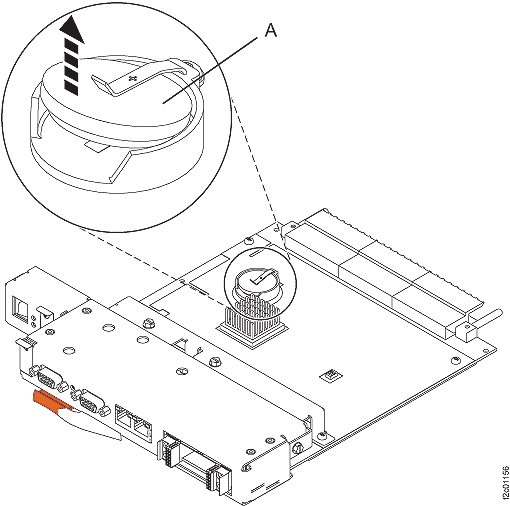 Note: Before installing the replacement battery, support the short horizontal section of the tab with needle nose pliers while simultaneously pressing the end of the tab down to increase the tension on the battery.
- Remove the time-of-day battery
- If replacing the service processor
card, and the new card does not have a VHDM EMC cover, do the following:
- Remove the EMC cover
 located on the right front of the
old service processor card. See Figure 5.
located on the right front of the
old service processor card. See Figure 5. Figure 5. Service processor card VHDM EMC cover 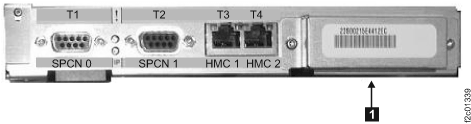
- Remove the EMC cover
- If replacing the service processor
card, and if the new card has a cover for the P1-I2C connector, remove and
discard it. See Figure 6.
Figure 6. Service processor card P1-I2C cover 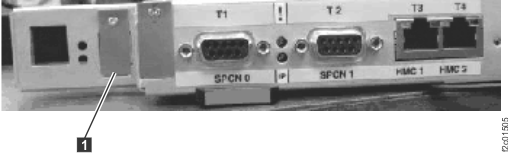
Install the service processor
Procedure
- Install the service processor.
- Slide the service processor all the way into the card slot in the system enclosure.
- Push the handle toward the service processor until
the release tab locks the handle in place. This will secure the service processor into
the card slot. See Figure 3.